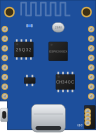
 Wemos D1 mini
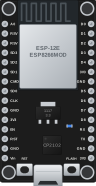 NodeMCU
What you need
- Board
- One of 2 boards: Wemos D1 mini, NodeMCU
- Parts
- Nothing else, the board is enough
- Also
- Wi-Fi network
How far this project is checked
Files in the catalogConfirmed. Version 16.0.0, builds for 3 board variantsWhat this means
- Checked
Chipnik stores the files of version 16.0.0, published November 6, 2026. The site signs each build, and the flasher compares every file with its checksum before writing it.
Builds: Wemos D1 mini, NodeMCU, v2, CP2102 USB chip, NodeMCU, v3 LoLin, CH340 USB chip.
A moderator reviewed the project before its first publication, November 6, 2026.
- Not checked
Whether the firmware works on a real board: the lines below are about that.
Author confirmed the pageNot confirmed yet. Not yet: Chipnik moved this project from GitHubWhat this means
- Checked
The files come unchanged from the releases of arendst/Tasmota. The developer is arendst, they have not confirmed the page yet.
- Not checked
That the developer knows about this page.
Is arendst/Tasmota your repository? Press the button: Chipnik checks through GitHub that your account owns it and moves the project to your profile. Sign in with GitHub to claim it
Firmware was writtenNot confirmed yet. Nobody has flashed it through Chipnik yetWhat this means
- Not checked
Whether the device works after flashing: the flasher cannot see that.
Built and worksNot confirmed yet. No build reports with a working device yetWhat this means
- Not checked
Chipnik does not build the devices itself. It is the word of the people who did, with their photos.
Tasmota turns an ESP8266 board into a smart home device with its own web page. It reads sensors, switches relays, runs rules and timers, and talks MQTT to Home Assistant and other systems without any cloud. Original project by Theo Arends and contributors on GitHub, GPL-3.0. Chipnik hosts the release binaries unchanged so you can flash them from the browser.
This is the standard tasmota.bin build for ESP8266 boards. After flashing the board opens a Wi-Fi network with a name that starts with tasmota. Connect to it, open 192.168.4.1 and enter your home network.
Then open Configuration, Module and pick Generic (18) so that all the pins of the D1 mini or NodeMCU can be assigned.
Firmware files come from the v16.0.0 release.
Build it
Nothing to assemble: the board and a USB cable are enough. See the project repository
After flashing
- The board restarts by itself when flashing is done.
- The project needs Wi-Fi. How to connect it is in the project text or in the source repository.
- If nothing happens, press the RST (EN) button once.
Built by people
Nobody has shared a build yet. Built it? Be the first.
Questions
No questions yet. Ask the first one about the build, the boards or the firmware.
Versions
16.0.0 added to Chipnik 2026-11-06
Release v16.0.0 of arendst/Tasmota, files unchanged. Release notes on GitHub